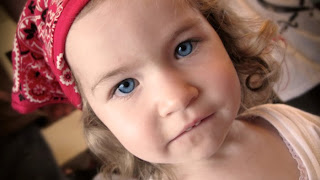
This photo I am about to share, I cannot take the credit for taking it, but I did however edit it. My sister took it with my camera(she has the same camera though) and I must say she did a great job! This is of her little girl. Now I know that I just did a photo of her in the last post, but she is just so cute I could help but post another!
Before:
After:
To achieve this look of the photo, I used camera raw's adjustment brush. I set the brush to 100% density and turned the exposure down a bit. Then to get the pink hat back, but lighter in color, I used the same brush, only I turned the density down to 80% and painted the it back.
Saturday, August 28, 2010
Friday, August 27, 2010
New Camera Raw: cute baby
So I have decided to still update this blog, and try out new projects to post. For this post, I took some photos of my niece in the pool. Then I edited in Camera Raw because the shadow on her face was too dark. I will show you the before and after!
Before:
After:
I lightened her face, and made the background more vibrant by using the adjustment brush!
Before:
After:
I lightened her face, and made the background more vibrant by using the adjustment brush!
Friday, July 30, 2010
Thursday, July 15, 2010
Scanography/Collage Scan
To do this project, I used an HP all-in-one printer/fax/scanner.
1. Juice: July 13, 2010; 9:30 a.m.; Idaho Falls, ID; HP Scanner
2. Hawaii: July 13, 2010; 9:30 a.m.; Idaho Falls, ID; HP Scanner
3. Pink: July 13, 2010; 9:30 a.m.; Idaho Falls, ID; HP Scanner
4. Bugs: July 13, 2010; 9:30 a.m.; Idaho Falls, ID; HP Scanner
5. lights: July 13, 2010; 9:30 a.m.; Idaho Falls, ID; HP Scanner
6. Marbles: July 13, 2010; 9:30 a.m.; Idaho Falls, ID; HP Scanner
Wow scanners are not an easy feat. At first my dad gave me a scanner, but little did I know that it was it too old for my computer, and I couldn't find a driver for it. So I had to try another scanner. So I used my roommates scanner, and I could get it to work either. I ended up staying up till 2:30 in the morning fighting with it. Still nothing! So then I went home the next day, and used my mom and dad's printer. At first it gave me problems too, but once I figured out what program to use, I had plenty of success! Then I realized how fun it was. The scan is of a juicer. It is probably my favorite object. I also scanned a lei, and a cool pasta tool with a pink paper background for the plain scan. I only edited the juicer, but cutting out the background and replacing it with black.
The edit I did is a combination of marbles, bugs, and lights. My goals was to put simple and small objects together, to make a cool design. I achieved this by cutting out the background and replaced it with a truer black. I then used the rotate tool to change all the shapes around! I think it turned out kind of cool! Who knew those shapes could make a cool design.
Thursday, July 8, 2010
Tuesday, June 22, 2010
Fine art
Flower: 6-15-10, 7pm, Benson, f/2.8, 1/160, na
Water Tower: 6-20-10, 9pm, Rexburg, f/2.8, 1/60, vibrancy, brighten
This project is beautiful and kind of simple! I remember I used to use this same method with text when I was much younger, but had forgotten how to do it. It still amazes me everyday how smart photoshop really is! The first one I added yellow to the background, text to the bottom, and then flattened the whole project and added a vignette. But I was really found of that, so I removed it. To make the text look more interesting I added a drop shadow and embossed it. The second project, I did the same things except I made the text blue, didn't add a drop shadow, and made the boxes a little slimmer. I really like the photos, and I am glad I got to use them in such a creative way. The template gives them much more justice!
Photolusion
Camera: Canon Powershot
Banana fight: 6-21-10, 5:30, Rexburg, f/8, 1/100, vignetteLike a bug: 6-20-10, 1pm, Gardens, f/2.8, 1/250, na
Part 1: 6-22-10, 12am, Rexburg, f/2.8, 1/15, brightened
Part 2: 6-22-10, 12am, Rexburg, f/3.2, 1/13, brightened
Part 3: 6-22-10, 12am, Rexburg, f/3.2, 1/15, brightened
This was a challenging project, yet fun! The hardest part for me was trying to be creative, and not copy someone online. The first photo it started with the one shadow just holding the banana, and then it turned into fighting over the banana! I thought I turned out pretty cool. To take this photo I had to wait for the right time of day so that the shadows wouldn't be too short, or tall. Then I had my subjects stand so that it looked like they were fighting over the banana. The hard part was trying to make it look interesting and not getting my own shadow in the photo. I just used a point and shoot for this photo. The next photo I wanted the girl in front to look like a giant pushing the little girls in dresses. I should probably call it Jane and the bean stock. :) I didn't add any edits to the photo, but I did use a flash to make the foreground brighter. My edited photo was really fun! I had tried and tried to figure out what I wanted to do. First I wanted to put someone on a building, and then I just didn't know how to get the right photo. So late that night is suddenly came to me to do the devil and the angel on my subjects shoulder. The lighting is my best, but it was fun to cut out the other photos and try and make it look believable. To cut them out I used the quick selection tool, and the black shirt was easier then the white shirt because of the contrast!
Tuesday, June 15, 2010
Elisabeth: 6-13-10, 2pm, Rexburg, f/8.0, 1/100, vibrance, levels
Canal: 5-9-10, 7:40pm, Idaho Falls, f/2.8, 1/25, vibrance, gausion blur in background, curves
Katelyn: 6-13-10, 2:30pm, Benson building, f/2.8, 1/400,vibrance, exposure
Borders are an amazing option. They can add a new life to a photo. In these photos, I tried to empathize that fact. The first photo I used a border that I had experimented with last year and made it bigger. The border was made out of a black rectangle with the inside erased with an edgy brush. On the photo I changed the opacity of the border to help it blend better to the photo. The next photo I used the history brush. First I deleted the picture, and then used a jagged brush to bring it back, only where I wanted it. Then used a spotty brush on the edges to add more photo to the finished product. Then on the bottom I used the crop to tool to add space so I could add words. The last photo is probably my favorite! I did it by copying the layer and then deleting the top photo's middle with the rectangular marquee tool. Before I cut it out though, I used the stoke tool to add the red line around the rectangular marquee tool was... notice it is close to the same color as her shoes because I used the eye dropper tool.
Night & Light
Pama: 6-14-10, 9:00pm, Rexburg, f/2.8, 16.0, vignette, curves, vibrance, tripod
Dance party: 6-14-10, 9:00pm, Royal crest bathroom, f/2.8, 16.0, vibrance, vignette, tripod
falling lights: 6-14-10, 11:50pm, rexburg, f/2.8, 4.0, vibrance, vignette
Taco time?: 6-14-10, 11:50pm, Rexburg, f/2.8, 16.0, vibrance, exposure, brightness, vignette, tripod
Posted: 6-14-10, 11:50pm, rexburg, f/2.8, 5.0, vibrance, exposure, brightness, vignette, tripod
Light painting is something I have never done before this, but I soon realized how fun it is. For these photos I had the chance to use my roommates help. The first photo was done with a dull flash light. My roommate used the flashlight to draw her name on the wall very slow. I used Shutter priority of 16seconds. The next photo is of me and two of my roommates dancing with glow sticks on our wrists and necks. This photo was the Shutter priority of 16 seconds also. The next photo is me walking by a passing car. I think it really looks like the stars are falling or something. This photo was 4 seconds. The last two photos are the same, except that I turned the camera a few degrees. Also the first one is 16 seconds, and the second is 5 seconds. I thought the lines were nice with the multiple colors. In the photos there were several cars and motorcycles passing by.
Tuesday, June 8, 2010
Photo a day template

So I was trying really hard to be creative and make my own, but I guess my creative genius must have not been working, because I couldn't think of anything. So I just used one of the examples and recolored it. First I changed the color of the background by putting a pink 50% opacity layer over the sample background. Then I changed the font and the date. After that I put the pictures in, and then put the days of the week on the photos.
To put the photos on I clicked on the brown part and then fit it to the square. A few of the pictures I had to crop it in a another doc to make them fit the frame.
But one time when I am feeling more creative, I will for sure try out making my own!
Photo Journal


Heart: 6-2-10, 11:46pm, Rexburg, f/2.8, 1/3, vignette, brightness adjustment
Keys: 6-3-10, 9:10pm, Spori, f/2.8, 1/60, vignette, exposure
Night: 6-4-10, 10:12pm, Rexburg, f/2.8, 0.8, vignette, brightness adjustment
View: 6-5-10, 3:30pm, Rexburg, f/2.8, 1/80, vignette, curves
Friends: 6-6-10, 9:00pm, Royal Crest, f/2.8, 1/60, vignette, desaturated, replace color
Sarah: 6-7-10, 5:30pm, Ricks Gardens, f/2.8, 1/320, vignette, vibrance, exposure, warming filter
Devo: 6-8-10, 1:10pm, Hart, f/2.8, 1/2
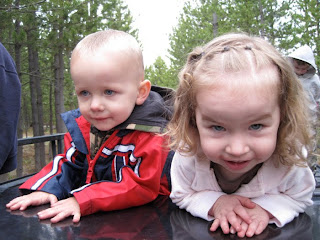
This was a fun project! I enjoyed have the chance to try and get different types of shots. The first picture I wanted to try and get a picture in my room, so I stood in the middle and looked around. The thing that stuck out to me most was my necklaces hanging on the wall, so I tried to get a cool angle on one. Also I wanted to focus only on one, but still see the others in the back. The next photo called Keys was in the Spori while I was doing some very stressful homework, I decided to take a break and get my pictures. The piano stuck out to me so I decided to get it as my subject. I used the macro button so that I could make the dept swallow. Then I added a exposure adjustment to give it a cool look. Night picture was taken over at the cute businesses by the car dealership and the middle school. The buildings over there have a really cute look to them. The only problem is that I really had my flash, and I have not invested in a tripod... so I had to hold the camera firmly on the ground to make it not blurry. View- My niece and nephew were at my apartment while my sister and I were hanging out. They were looking out the window, and it looked so cute that I thought I'd snap their picture. This is through my front window screen, while she was eating some crackers which explains her expression :). In friends, my roommate were walking to ward prayer. Since ward prayer is very much apart of sunday and it was raining, I thought it was the perfect picture to represent the day. This picture was the most labor intensive because I had to change the middle sweater by cutting it out and then replaced its color from brown to green. Then I desaturated it and masked out the other jackets. After that there were some light spots all over the picture, so I used the healing tool on those. Sarah- I decided that I wanted to do a photo shoot with my pretty friend Sarah, so we went to the Gardens while it wasn't raining and just took some random photos. I like this one because of the reflection in the water that looks neat! The last is Devo. I really wanted to get a picture of devotional because it is such a huge part of my life! This semester I have the opportunity to be the devotional ushering director, so in this picture I wanted to get the hustle and bustle that happens 5 minutes before devotional starts!
Tuesday, June 1, 2010
Enhancements
Before:

After:

Before:
After:

Before:

After:

Example

Camera: Canon Powershot
Flower child: 5-31-10, 3:30, Island Park, f/3.5, 1/80, Replace color
Eyes: 5-29-10, 11:16am, Ammon, f/2.8, 1/25, Enhancements
Friends and rivals: 5-31-10, 3:20, f/8.0, 1/60, match color.
On the first picture I wanted to get my niece but still focus on the flower so that the contrast was really good. Then I used the adjustments to change the flower color from yellow to orange. I was really trying to pick a realistic color to replace with. The second edit I wanted to draw out her eyes and make them look really blue so I adjusted the curves and levels and masked out her eyes so the color stuck out. Then I added a vinette and smoothed out her little 3 year old scratches with the healing brush. The last set I wanted to light up the color, it was getting later in the day and so they were looking a little dark. Also I focused the camera on the wrong focus point. So I used the adjustment feature thingy to match the color to the last picture!!

After:

Before:
After:

Before:

After:

Example

Camera: Canon Powershot
Flower child: 5-31-10, 3:30, Island Park, f/3.5, 1/80, Replace color
Eyes: 5-29-10, 11:16am, Ammon, f/2.8, 1/25, Enhancements
Friends and rivals: 5-31-10, 3:20, f/8.0, 1/60, match color.
On the first picture I wanted to get my niece but still focus on the flower so that the contrast was really good. Then I used the adjustments to change the flower color from yellow to orange. I was really trying to pick a realistic color to replace with. The second edit I wanted to draw out her eyes and make them look really blue so I adjusted the curves and levels and masked out her eyes so the color stuck out. Then I added a vinette and smoothed out her little 3 year old scratches with the healing brush. The last set I wanted to light up the color, it was getting later in the day and so they were looking a little dark. Also I focused the camera on the wrong focus point. So I used the adjustment feature thingy to match the color to the last picture!!
Subscribe to:
Comments (Atom)


