
Thursday, May 27, 2010
Tuesday, May 25, 2010
High Dynamic Range


All: 5-21-10, Bannack Ghost Town, Sony DSC-H7, 1:30pm
1. f/2.7, 1/500
2. f/3.5, 1/500
3. f/5.0, 1/500
This was my very first time with HDR, and I think it ended up pretty cool! I'm not use what adjustments I made, except that I used the mysterious light in red, and up the vibrancy in the rust!


5-21-10, Bannack Ghost Town, Sony DSC-H7, 3:30pm
1. f/6.3, 1/1250
I decided to do this one as a pano of the whole town! I mostly played with the vibrancy, I'm just not sure how I feel about the ad thingy being so large. Oh well you can still get the point, and maybe one day I'll buy that HDR program just because it makes pictures look so cool!!
Macro Abstract


All: 5-21-10, Bannack Ghost Town, Sony DSC-H7
1: 9:30am, f/2.7, 1/50
2: 2:00pm, f/2.7, 1/8
2: 2:00pm, f/2.7, 1/8
For this one I just used the overlay tool to combine the two pictures together. Then I masked out a little bit of it. Also I added a vinette, and adjusted the exposure. I think it ended up looking pretty cool!
Reverse Shallow Depth


All: 5-21-10, Bannack Ghost Town, Sony DSC-H7
1: 9:30am, f/5.0, 1/250
2: 9:30am, f/5.0, 1/250
3: 1:30pm, f/2.7, 1/30
4: 1:30 pm, f/2.7, 1/25
I think that this type of picture taking is one of my favorites, and to tell you the truth I have been playing the back and forth focus game for a couple of years now. It cool to see that by just changing what your camera is pointing at. As for editing, I did alot of the typical stuff to them: I added a vinette, adjusted the exposure, and adjusted the vibrance. I really like both my photo-sets in a different way, but there is something I like about peeping through the door in the old school!
Monday, May 24, 2010
Action Blur & Freeze


All: 5-21-10, Bannack Ghost Town, Sony DSC-H7
1: 1:30, f/4.5, 1/500, vinette, vibrance
2: 2:15, f/8.0, 2.5, desaturate, but I used a mask to bring out his blue shirt.
3: 1:30pm, f/8.0, 2.5
I didn't do much to these pictures except the 2nd one. I pretty much added all the adjustments to it, to make it less dark. It was fun to learn how to use the camera to make a "ghost" pictures, it was amazing that just changing the settings can make such a cool picture. At first I couldn't get a good one of anybody else, so I used my timer, and ended up getting one of myself!
Portraits


All: 5-21-10, Bannack Ghost Town, Sony DSC-H7/Canon Powershot
1: 3:30pm, f/2.7, 1/13; desaturated/mask face
2: 9:15am, f/5.0, 1/250, vibrance
3: 1:30pm, f/3.5, 1/80; vibrance, exposure
4: 9:15am, f/4.5, 1/250, vibrance
5: 9:30am, f/2.8, 1/640, vibrance, desaturation
6: 9:30am, f/5.6, 1/400, vibrance
I've never been very good at portraits, but it was fun to try! I think the best part of taking them, is editing them. I've added vibrancy to most of them, some of them exposure, and pretty much all of them have a vinette! I even tried some desaturation! Laura's sweater was perfect for using as an accent color. All in all, it was a fun to try out!
Tuesday, May 18, 2010
Camera Raw


Original-
Camera: Cannon Power shot
Mariah; May 14, 2010 7:30pm
Rexburg; f/2.8; 1/60
Edit-
In Raw I did alot to the Photo! I adjusted the temperature to make it warmer. Then I added quite a bit of a vignette, and added some fill light. Then I played up the black and exposure to play up the darks and shadow. Then I upped the clarity quite a bit, and played with the vibrance. Last used the curve custom feature to light up the photo.
I just really wanted to play the picture up the best I could. Raw is really cool because it makes playing with it much easier, and it is extremely easy to change it back. The only problem I had was trying to post the original photo, so if it is the wrong size I apologize! I couldn't get it to size down with out going back to the edited one!
Monday, May 17, 2010
Panoramic
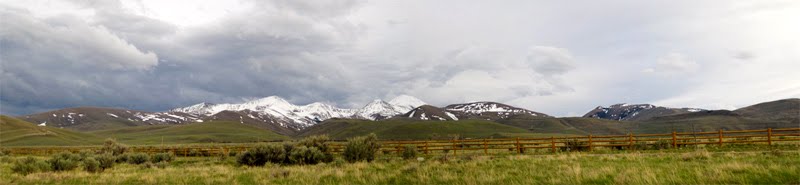


Cloud Pano
5/17/10 1:45pm
Dry farms, f/8.0
1/320, Cannon Powershot
This was a hard project for me!! I wasn't sure what was worth taking a panoramic picture of! I drove all over Rexburg trying to find something pretty! I finally gave up, because I couldn't find the place I was looking for. Anyway I was pretty disappointed, but then I decided to try the pictures I did take, and they didn't turn out too bad! The editing I did on them was: I really upped the vibrancy,
and the exposure! Then I added a Vignette! It was amazing to see how the pictures really come together, I really have a appreciation for photoshop!
and the exposure! Then I added a Vignette! It was amazing to see how the pictures really come together, I really have a appreciation for photoshop!
Tuesday, May 11, 2010
Flexible Edits
Before:
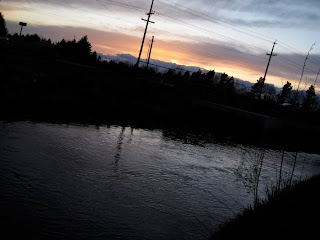
After:
Camera: Canon Powershot
1: Sunset; 5/9/10; 7:35pm; Idaho Falls; f/2.8; 1/125; level adjustment
Not a Huge change. But I used the level adjustment make the water and bridge lighter, and then masked the sky so that I could keep the beautiful sunset. Also I added a photo filter to bring out the blue in the water, and the orange in the sky. Last I used the vibrance adjustment to the sky.
I learned that adjustment layers are great because if you don't like it anymore you can just send it to the trash, and it doesn't affect your photo. I also learned on this photo about centering your camera on where you want the focus. I pointed my camera at the sunset instead of on the water, which made the bridge dark. But editing the darker part was easier than trying to get the color back! I just think that Idaho is so pretty, and spring nights rock!
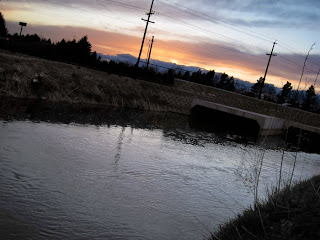
Before:

After:

Camera: Canon Powershot

After:

Camera: Canon Powershot
1: Sunset; 5/9/10; 7:35pm; Idaho Falls; f/2.8; 1/125; level adjustment
Not a Huge change. But I used the level adjustment make the water and bridge lighter, and then masked the sky so that I could keep the beautiful sunset. Also I added a photo filter to bring out the blue in the water, and the orange in the sky. Last I used the vibrance adjustment to the sky.
I learned that adjustment layers are great because if you don't like it anymore you can just send it to the trash, and it doesn't affect your photo. I also learned on this photo about centering your camera on where you want the focus. I pointed my camera at the sunset instead of on the water, which made the bridge dark. But editing the darker part was easier than trying to get the color back! I just think that Idaho is so pretty, and spring nights rock!
Before:

After:

Camera: Canon Powershot
1: Sunset; 5/9/10; 6:50pm; Idaho Falls; f/2.8; 1/60; level adjustment, Curves adjustment, vinette, and a smart filter.
After adjusting the curves and levels, I used the Poster edges as a smart filter. Then to make the masking easier I used the quick selection tool on the flower bunch so that the masking would only draw on the selected part. Then I used the vingette filter to lighten the edges. The flowers are just in my neighbors yard in Idaho Falls, but I really like the sun shining behind the flowers.
Flora & Fauna


1. Tree sunset; 5/9/10; 7:10pm; Candy cane lane; f/8.0; 1/160; Slight level adjustment and slight vignette.
2. peeking; 5/9/10; 6:50pm; Idaho Falls; f/2.8; 1/60; Slight level adjustment and slight vignette.
3. Grass; 5/9/10; 7:15pm; IF park; f/2.8; 1/60; Curve adjustment and vignette.
4. Duck; 5/9/10; 7:30pm; IF Park; f/4.9; 1/100; I used zoom to make the duck look closer.
5. dried; 5/9/10; 7:30pm; IF canal; f/4.9; 1/30; I used curve adjustment and vignette.
6. Yellow; 5/9/10; 6:50pm; Idaho Falls; f/2.8; 1/60; I used just a little bit of Curve adjustment.
7. Cat; 5/9/10; 7:00pm; Idaho Falls; f/2.8; 1/6; I used Curve and level adjustment as well as add vignette.
Sorry there are so many pictures, but this was a really fun project for me! During this project I learned a lot about lighting, and how to use it to your best advantage. Also I learned how to edit my pictures better. I keep seeing people use vignette, but I had no idea how to use it. So in order to figure it out I looked up a tutorial on google, and realized how easy it is and how cool your pictures look afterward.
I found out how hard it is to make a cat hold still, especially when your camera keeps shining a red light in his face. Also I found out that birds are extremely smart, and know when you are trying to take their picture. I had a close encounter with a red-winged black bird, that kept switching sides with me at the canal. I was not however able to take his picture, which was sad because they are a really pretty bird!
I never realized how cool photography can be, especially when a little editing can make it look even better! It really helped me to appreciate what a beautiful place I grew up in... Good old Idaho Falls!!
Tuesday, May 4, 2010
Blends & Type


This was a fun project! I never thought of taking pictures of textures before, so I felt pretty weird taking pictures of dirt and carpet. I sure I got some weird looks too. Also I gained a love for the overlay feature. Anyway the first one I did just an overlay, and then I did a mask and softened some of the carpet with the black paint. Also i did a black paint border and then overlaid it and changed the opacity. The picture of the Spori arch was fun to take.
The Second one, I'm not sure how I feel about the word, but my biggest goal was at least to play with words on the photo. The photo is of the tree in front of the snow building. I was playing with focus on this picture. I did another black border, and faded the opacity, and gave it a color overlay to green. With the text, I sandwiched it between the background, and a copy of the back ground. Then I merged the top layer to the text and then beveled and embossed it.
Camera: Canon Powershot SD1200 IS
Carpet: 5/3/2010; 4:40; Spori; f/2.8; 1/60
Arch: 5/3/2010; 4:40; Spori; f/2.8; 1/60
snow tree: 5/3/2010; 4:40; Campus; f/2.8; 1/500
Color Study: White


I decided on white, but I had a hard time deciding on just 4, so I picked 6. This project was a blast because it gave me the chance to look around my world. It was fun to try and find the most obvious, and the not so obvious examples of white. My favorite thing was trying different angles, and focuses. Also what white project would be complete without the Temple. When I was taking the pictures of the Temple, it was so windy that I had to plant my feet firmly so my picture wouldn't come out blurry. I didn't edit any of my photos, I just tried the best I could to get my color across. I hope you enjoy!
Camera: Canon PowerShot
Temple: 5/3/2010; 9:30pm; ; Rexburg; f/2.8; 1/20
Spori tree 1: 5/3/2010; 4:30pm; Rexburg; f/8.0; 1/200
Spori tree 2: 5/3/2010; 4:30pm; Rexburg; f/8.0; 1/200
Pin: 5/3/2010; 4:40pm; Rexburg; f/2.8; 1/25
Elevator: 5/3/2010; 4:40pm; Rexburg; f/2.8; 1/30
Post: 5/3/2010; 4:20pm; Rexburg; f/8.0; 1/250
Subscribe to:
Posts (Atom)